Are you considering a Solar Panel Kit for your Campervan, Motorhome, or Roof Tent?
Is it safe to say you’re feeling…:
- Confused by terms?
- Overwhelmed by choices?
- Like you’re drinking from a fire hydrant of information?
Fear not, my solar seeker. We’ve compiled a reasonably short guide to quickly understand:
- Benefits of Solar Panel Kits
- Basic Terms to Know
- Critical Components
- Determining Power Needs
- Understanding Battery Types
- Wiring Systems to Consider
- Basic Set-Up & Installation.
Yay, Solar Panel Kits
It’s an exciting time for those looking to become more self-reliant and adventure further, all while powering modern technology anywhere in the world. Solar panel kits have opened a world of possibilities. Your most challenging job is deciding WHICH solar equipment to buy, rather than IF you buy one at all.
In case you’re still on the fence…
Quick-Fire Benefits of Solar Panel Kits for Your Rig
- Electricity = Fridge = Cold Beer Always
- Power that CPAP machine for quality sleep anywhere.
- Range is no longer limited to how long you can keep your food from spoiling.
- Take Zoom calls and send emails from your campervan while parked on the side of a mountain.
Basic Terms to Know
You’ve likely encountered many confusing terms and concepts if you’ve already started down the solar panel rabbit hole.
While you don’t need to memorize these definitions, familiarizing yourself with these terms will make your research much smoother.
- Alternating Current (AC):
- The form of electricity supplied to houses and comes out of your wall socket.
- So-called for the periodic reversals of direction.
- Ex. Appliances, televisions, heaters. Usually, anything with a plug.
- Direct Current (DC):
- Electricity that only flows in one direction.
- Variety of uses, including batteries and solar panels.
- Ex. your battery-powered torch uses DC.
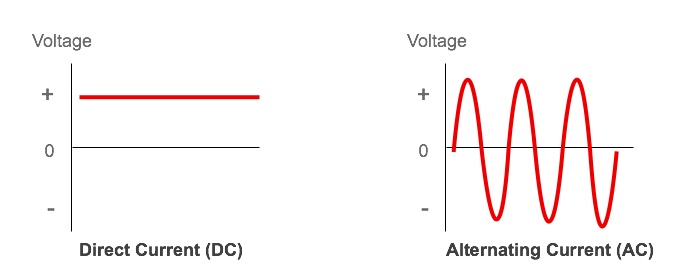
(Photo Credit: Freeingenergy.com)
- AC to DC Conversion:
- An electrical device called a converter changes the voltage from Alternating Current (AC) to Direct Current (DC).
- Since your wall socket/home appliances use AC and electronics/batteries use DC, the current must be changed or converted.
- DC to AC Inversion
- An electrical device called an inverter changes Direct Current (DC) to Alternating Current (AC).
- Ex. Inverters convert DC power from solar panels to AC power for the electric grid.
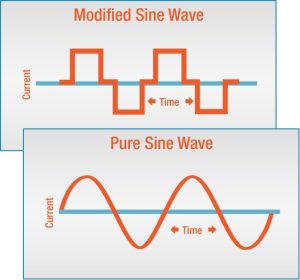
- Pure Sine Wave:
- DC to AC inversion results in an electrical flow that resembles an Aztec temple (modified sine waves) rather than smooth hills (pure sine waves).
- The modified sine waves will do the job; however, they can damage certain electronics (ex. CPAP machine with a heated humidifier).
- A power station producing Pure Sine Waves is more efficient for AC electronics (ex., refrigerators).
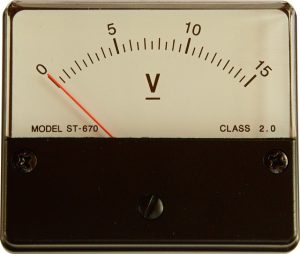
- Voltage (Volts)
- Voltage is the electric potential/pressure/tension at which electricity flows through a system. It measures the energy within an electric circuit at a particular point.
- Volt is the unit of measurement.
- 12V
- The voltage of standard car batteries and most appliances built specifically for caravans and boats.
- It’s what you’ll use when plugging into a cigarette lighter.
- Watt-Hours vs Amp-Hours
- Watts refers to the power used by electrical equipment. Watt-hours refer to the total energy used over time, acknowledging a battery’s voltage.
- Amperes/Amperage (Amps) measures the rate of electrical flow through the circuit. The larger the amperage, the more electricity it can take. Large appliances (ex., dryers) draw more power and thus need larger circuits. Amp-hours tells you how much current a battery can supply over time.
- You will often see batteries rated in amp-hours, but as long as your units are consistent, either measurement works. Additionally, watt-hours and amp-hours are related and can be used to figure out the other.
- Calculating both is important in determining battery capacity, wiring thickness, and voltage. Don’t worry, the equations are simple, and we’ve got them below.
- Photovoltaic System
- Also known as PV systems or solar power systems. Converts sunlight into electricity using semiconducting materials.
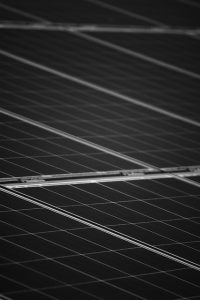
- Monocrystalline Solar Panels
- Also called single-crystal panels. They are made from a single piece of silicon and are black. Because it’s composed of a single cell, electrons have more room to move around and are thus more efficient.
- Generally considered the best-performing solar panels but are also the most expensive.
- Polycrystalline Solar Panels
- Made from multiple silicon solar pieces melted together. With more crystals in each cell, the electrons have less room to move around, making them less efficient.
- They’re usually blue in color and are more affordable.
- Depth of Discharge (DoD)
- How much you can access a battery’s total capacity (ex., 50% DoD of a 200Ah battery means the battery can be discharged to 100Ah).
- Life/Charge Cycle
- The battery’s expected life span.
- Roughly calculated by the number of full battery discharges. 100% to 0% = 1 cycle. 100% to 50% = 0.5 cycles.
- The capacity of a rechargeable battery decreases through time and usage. For example, 2000 cycles to 80% capacity means you can fully charge and discharge 2000 times before losing 20% capacity.

Components
- Solar Panels:
- Captures sunlight and converts it into electricity.
- Options include the more efficient and expensive Monocrystalline or the more affordable Polycrystalline.
- Rigid solar panels are sturdier and more efficient, although heavier and more challenging to mount.
- Flexible solar panels are lightweight, easier to mount, and better for stealth camping. However, they are less efficient and have a shorter lifespan.
- Batteries:
- Often the most expensive component.
- Stores the electricity captured by the solar panels.
- Several types of batteries to choose from – Keep scrolling for a quick breakdown of battery types and which might be best for you.
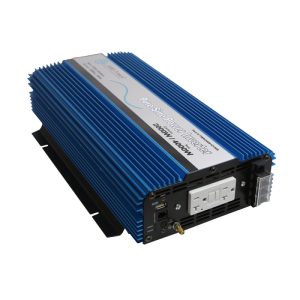
- Inverter:
- Converts DC electricity into AC electricity. Typically seen in on-grid solar systems.
- Battery Monitor:
- Ensures that your batteries are not depleted past their recommended depth of discharge.
- Cheap options typically only monitor the voltage and state of charge. They are also more likely to be affected by the load on your batteries and do not always accurately reflect the current state of charge.
- On the other hand, Pricier battery monitors use a variety of data for more accurate readings on voltage, current, amps, the exact state of charge, time until depletion, and temperature. Many also now include Bluetooth capabilities so you can monitor your batteries from your phone.
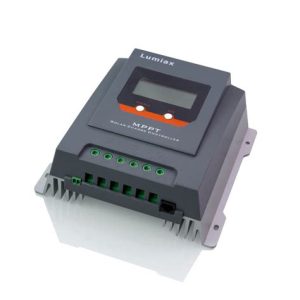
- Charge Controller:
- Also known as a Solar Charge Regulator. Its job is to control/regulate the Direct Current (DC) from the solar panel to make it as efficient as possible and prevent overcharging the battery.
- Typically two options are offered:
- Maximum Power Point Tracking (MPPT): Adjusts voltage and current to optimise energy delivery and output.
- Pulse Width Modulation (PWM): Industry standard, cheaper, and less efficient; some energy will be wasted, but it is not a concern with lower powered panels (ex. 100 watts).
- Mounting Hardware & Cables
- Not all kits include mounting hardware and cables. You may need to purchase it separately.
- Generally recommended to stick with the same brands’ hardware, as it is designed specifically for that equipment.
- Voltage Sensing Relay (VSR)
- Also known as a battery to battery charger.
- Allows you to charge your leisure battery via your alternator while you drive.

Calculating Your Exact Power Needs
Making a relatively accurate prediction on battery usage is essential in selecting the appropriate power system.
This section requires a bit of math, but fear not, we’ve cooked down the essentials to make it digestible.
- Step 1:
- Gather all of the appliances you plan to power.
- Write down the Wattage of each appliance.
- Remember that some appliances draw a massive amount of electricity (ex., microwave) and thus might not be an excellent option for solar power.
- Step 2:
- Calculate Amp-hours (Ah) using the equation below.
- Watts ÷ Volts = Amp hours (Ah)
- Your appliances will determine your Wattage.
- The voltage is 12V. This is the voltage of your batteries.
- Step 3:
- Next, determine how many hours your appliance will be used per day.
- Multiply the Amp hours of each appliance by how many hours it will be used per day.
- Ah x usage (hrs) = Ah/day
- For example:
| Appliances | Qty | W | Ah | Usage (hrs) | Ah/day |
| Laptop | 1 | 30 | 2.5 | 2 | 5 |
| CPAP | 1 | 80 | 6.7 | 8 | 54 |
| Fridge | 1 | 50 | 4.2 | 15 | 63 |
| iPhone | 2 | 20 | 3.4 | 2 | 7 |
| Blender | 1 | 400 | 33.4 | 0.1 | 3.5 |
| Total | 132.5 | ||||
Before we celebrate, we need to determine our battery bank size.

(Photo Credit: Outdoor Roadie)
Usable Battery Capacity
Not all batteries are created equally. Efficiency, recharging, capacity, and access to that capacity vary depending on your battery type.
Please don’t fret about which battery you should go with… that’s a personal decision with many considerations we will address shortly. If in doubt, calculate for several battery types to give yourself more options.
Let’s walk through it together using our previous example.
- Let’s say we want to go 2 days between charges…
- 132.5 Ah/day x 2 days = 265 Ah Capacity
- But knowing that not all batteries discharge their total capacity, we need to calculate this disparity.
- Using the table below…
- Divide your Required Capacity by the Usable Capacity of your desired battery type. In this example, we are looking to purchase a Lithium battery.
- 265 Ah ÷ 0.95 = 279 Ah battery bank
| Flooded Lead Acid | AGM & Gel | Lithium | |
| Usable Capacity | 50% | 80% | 95% |
| Divide By | 0.5 | 0.8 | 0.95 |
Congratulations if you’ve made it this far!
You just calculated your battery bank size!
Are you now a budding electrical engineer? Probably not.
But you’re on your way to determining which solar panel kit will keep the lights on in your adventure mobile.
Know Your Batteries
Solar panels without adequate battery storage are like using a boat with a mesh sail…lots of wasted potential. Not to mention, you’re going nowhere.
We’re doing our best to keep this short and sharp, so here are the bare essentials to know about batteries.
Standard Flooded Lead Acid
Standard Flood Lead Acid Batteries are your classic caravanning battery that works by conducting electricity through a liquid.
- Pros:
- Cheap upfront costs.
- Less sensitive to overcharging.
- Cons:
- Heavy
- Only mounted upright (liquid).
- Regular maintenance is required.
- Produce Hydrogen gas (ventilation required).
- Risk of spilling battery acid.
- Best For:
- Don’t bother.
- Outdated, lots of maintenance, and is more hazardous than other options.
Sealed Flooded Lead Acid
Sealed Flooded Lead Acid batteries function much in the same way as Standard Flood Lead Acid cousins, except that they are sealed, and thus spilling and topping up liquids isn’t an issue.
- Pros:
- No maintenance.
- Low starting costs.
- Less sensitive to overcharging.
- Cons:
- Heavy
- Short lifespan.
- Only mounted upright.
- Should not discharge below 50%.
- Best For:
- Just get an AGM; same cost and more usable capacity.
Gel
As the name implies, Gel Batteries use a gel or thick paste as the electrolyte (electrical conduit). This allows you to orient the battery in any direction.
- Pros:
- Longer lifespan.
- No maintenance.
- Great for hot climates.
- Can be deeply discharged, although it’s better if they’re not.
- Cons:
- Heavy
- Expensive
- Easily damaged if overcharged.
- Best For:
- Scorching environments.
- Otherwise, avoid it due to the sensitivity of overcharging and ultra-specific charging requirements.
AGM
A popular choice of battery, AGM’s utilise a thin fibreglass electrolyte mat which allows it to be mounted sideways.
- Pros:
- Long lifespan.
- No maintenance.
- Best for cold climates.
- It can be deeply discharged.
- A favourite choice among lead acid batteries.
- Cons:
- Heavy.
- Easily damaged if overcharged.
- Best For:
- Cold climates.
- Low to medium usage situations.
- Adequate for high usage scenarios, but batteries must be replaced more often.
Lithium Ion
Lithium batteries are one of the best, yet most expensive, options on the market – A favourite amongst weight-conscious rigs looking to venture off-grid for long periods.
*Note: A Battery Management System (BMS) is essential for Lithium battery users. The BMS prevents over and undercharging of your sensitive and expensive batteries. Some Lithium Ion batteries come with a BMS; others require an add-on.
- Pros:
- No maintenance.
- Longest lifespan on the market.
- Extremely light compared to Lead Acid.
- Deep discharges = smaller battery bank.
- Cons:
- Expensive.
- Sensitive to overcharging.
- Not great in cold weather.
- Best For:
- High usage or those with specific weight/space requirements.
- Those keeping their vehicle for a long time and thus want to avoid swapping out batteries.
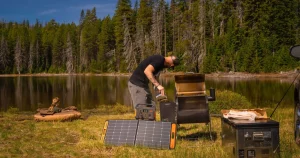
Wiring & Installation
Wiring and installation are the final steps and arguably the parts that scare most people away.
There is nothing wrong with paying a professional to install your electrical system, especially with more complicated and higher-powered systems.
That said, you can install a basic system yourself. The added benefit is that you’ll have a deeper understanding of the electrical system and can more easily problem-solve should an issue arise.
With various vehicles and electrical needs, there’s no one way to configure your system. We’ve linked helpful videos of multiple installations to curate your needs.
General Principles
- Fewer holes, the better.
- When in doubt, consult a professional.
- Use the appropriate gauge wiring.
- Make sure to seal any holes from water.
- Any 60V or higher DC charge can electrocute you if you touch the conductor.
- Cover up conductors.
- Use insulated gloves & tools.
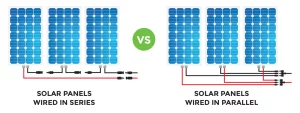
Parallel vs Series Wiring
Your wiring set-up can go three ways:
- Parallel
- Series
- Parallel-Series Hybrid
Your choice really comes down to where you intend to travel to.
Will it generally be sunny, or will you use your panels in all sorts of weather?
Are you planning to visit Southern Spain often, or will you be camping in Scotland mostly?
Parallel Wiring
This causes your current to increase and your voltage to remain the same.
- Pros:
- Quicker charge.
- It can keep charging even if one panel is damaged or shaded.
- Cons:
- Fuses required.
- Needs uninterrupted sunlight.
- Best for:
- Sunny climate
Series Wiring
Series wiring does the opposite of Parallel wiring. Voltage is increased, and the current remains the same.
- Pros:
- Low amperage = less voltage drop between panels/batteries.
- No fuses are required as long as proper gauge wire is used.
- Access to higher voltage input to ensure charging in dull weather.
- Cons:
- Charging is affected if one panel is damaged.
- Best for:
- Cloudy climates.
Parallel – Series – Hybrid
It is possible to combine Parallel and Series Wiring to better balance voltage and amperage.
- Pros:
- Capture sunlight even when one panel is shaded.
- Allows for greater Watts even if your Charge Controller doesn’t accept high voltage.
- Cons:
- Fuses required.
- Not always optimal.
- Best for:
- Just about anywhere.
Here’s a helpful video with diagrams to better understand which system might serve you best.
Basic Vehicle Set-Up
Car
Some car drivers drill holes into their boot to thread wiring for a more permanent fixture. Relatively straightforward and doable. But generally not necessary.
For most, a portable power station and portable solar panel is an ideal choice.
No drilling, wiring, or modifying of your vehicle is required. Given a car’s space and weight limitations, you are unlikely to carry enough electrical equipment nor have the space for a permanent solar system.
Pick Up Truck
Pick-up trucks with a topper provide a simple and effective platform to mount solar panels. Wiring is more manageable, with less interior space to navigate.
- This video of a 200W solar install shows a straightforward method.
Caravans, Vans & Motorhomes
Caravans, vans, and motorhomes provide excellent platforms for catching solar power. They’re high up and freer of obstructions.
The catch is that the installation is more involved, and extra attention must be paid to water-sealing any new holes that are drilled.
It’s easier to install wiring during the build phase, as the walls and flooring are exposed.
But fear not if you want to add solar to a long-ago finished van or motorhome. Threading wire through the existing framework is not complicated. Again, you can always hire a professional to do the wiring if it’s genuinely stressing you out.
- Here’s a great video showing an easy van install that can be translated to other vehicles.
Let’s Wrap This Up!
Admittedly, you’re not yet an expert on solar panel systems.
But you don’t need to be.
You’re installing solar panels, not building and designing them.
So, celebrate!
You’ve passed the introductory course and now understand solar power language, key components, wiring systems, installation, and calculations to determine power needs.
To make your installation smoother, we recommend using the links to dive deeper and learn from countless others who have installed their solar systems.
Solar power systems can transform your camping experience and allow you to venture further and more comfortably.
We hope you learned something
&
Have fun with the process!
*this article was originally written for Outdoor Roadie in March 2023
